


Ya sé que estaréis pensando... otro marco! No sé que tengo con los marcos que me encantan! Últimamente he visto un montón de letras enrolladas con cáñamo así que pensé y por qué no un marco? y aquí está. Como siempre es fácil de hacer y barato, manos a la obra!
I know what you are thinking now... another frame! I don't know why but I have a thing for frames, I love them! I've seen lately a lot of letters wrapped with hemp so I thought, why not a frame? And here it is. It's, as always, a simple and cheap project, let's get down to work.

Materiales:
Cartón 3 piezas
Cáñamo
Cutter
Cola blanca
Supplies:
Cardboard 3 pieces
Hemp
X-ACTO knife
Glue
Modo de hacerlo:
1. Cortar el cartón (las 3 piezas) de las medidas que quieras (el mío mide 22 x 22 cm aprox.).
1. Cut the carboard the size you want your frame to be (mine is 22 x 22 cm more or less).

2. Pegar las tres piezas para que nos quede un marco de cierto grosor.
2. Glue the three pieces so we can have a thick frame.
3. Trazar 4 líneas con un lápiz en el cartón superior y formar una cuadrícula de 9 cuadros iguales.
3. Draw 4 lines with a pencil on the carboard and create a grid with 9 equal squares.

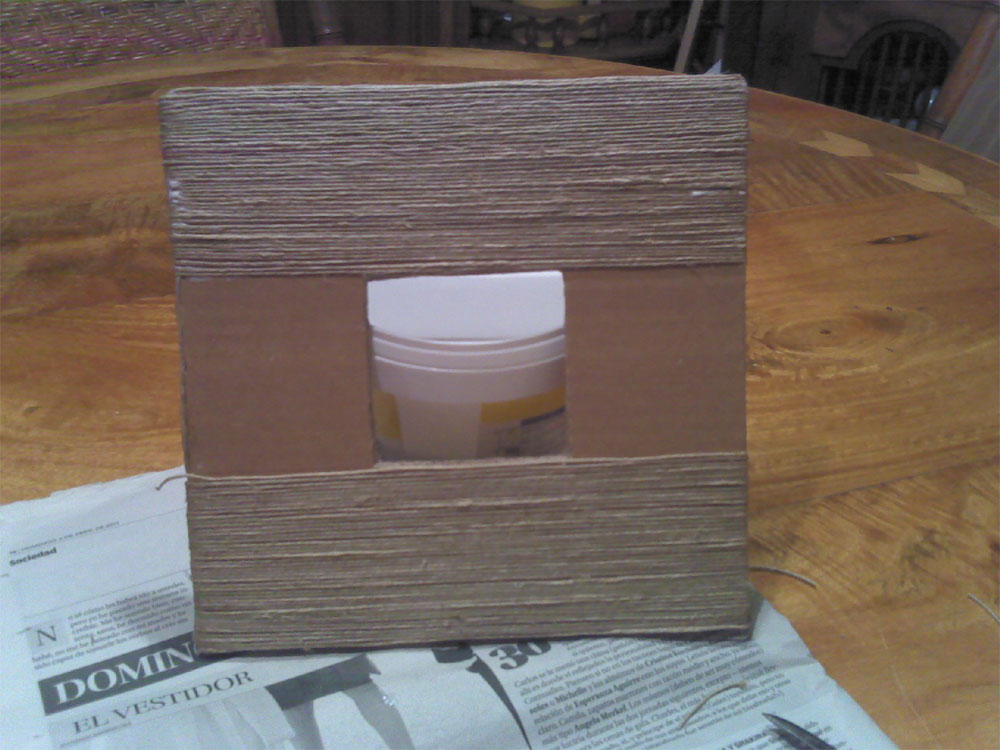
4. Cortar el cuadro central que será donde irá la foto.
4. Trim the central square off , here we will put the picture.

5. Enrollar y enrollar y enrollar el cáñamo.
5. Wrap and wrap and then wrap a little more the hemp.
Primero por los bordes.
First the edges.

Luego seguir por la parte superior e inferior de forma horizontal.
Then the upper and lower part of the frame horizontally.
Continuar por los laterales de forma vertical.
After that, the sides, vertically.

Y por último, enrollar por la parte central de forma horizontal.
And last, wrap the central part horizontally again

Creo que la explicación no ha quedado muy clara pero espero que con las fotos se entienda. Aquí he puesto el orden en el que tenéis que enrollar.
I think that the explanation is a bit confusing but I hope that the pictures make it clear. Here you have the order you must follow to wrap the frame.

Ya sólo queda colocar una foto que nos guste y situarlo en algún sitio que se vea mucho! :) Yo todavía no he decidido si colgarlo en la pared o ponerlo en la estantería...
El marco me costó un par de noches de hacer (mientras veía la tele) pero ha merecido el esfuerzo!
Espero que os haya gustado y que lo hagáis!
The only thing you have left is find a great picture, and place the frame in the spotlight of your house :) I haven't decided yet if I'll hang it or if I'll place it on the shelf...
This project was a little time consuming, I made it while I watched the tv but it was worth it!
I hope you liked it and that you make it!

Parties:
See the sidebar
I am following your blog with GFC(Glamorous Girl)
ResponderEliminarnow follow back my blog with GFC too
http://glamorousgirlblog.blogspot.com/
I am also hosting a biggest giveaway
International Giveaway: Win Rimmel London "3 Goodie Bags Worth 400 AED(100US$)"
http://glamorousgirlblog.blogspot.com/2012/02/giveaway-win-rimmel-london-3-goodie.html
Love it. Especially the way you get the different direction of the wraps. Going to have to try this.
ResponderEliminarHi ~ Thanks for stopping by my blog! Love your post! I'm not sure how to view your Blog with the Translator working, I'll figure it out :) Thankfully you have GREAT pictures, so I see exactly how to make this! Great job! Love it! I'm your newest follower! Looking forward to your future posts! Cheers ~ Mary
ResponderEliminarOkay, I missed that right below each step, was the English translation. YAY! So sorry aboout that! Really looking forward to following your blog!
ResponderEliminarThis is so cool! Great job.
ResponderEliminarShelby
I LOVE this! It's beautiful!
ResponderEliminarDropping by from the Linky hop to spread some linky love. Come on over to Happy Hour Projects and say hello - and feel free to link this up while you're there! My Freestyle Friday link party is open all weekend!
Hope you're having a fantastic Friday!
Adrianne
www.happyhourprojects.com
Love this! What a great idea.
ResponderEliminarThanks for visiting and following my blog! This frame is wonderful - I love the look! Happily following you back x
ResponderEliminarThis is so awesome! I actually have some old frames that I don't care for. I'm wondering if I can just use them? What a wonderful idea! I'm your newest linky follower and look forward to visiting again and learning from you! We think you'd love See Beautiful too!
ResponderEliminarHappy seeing beautiful!
http://seeabeautifulworld.blogspot.com/
This is great! And yes, I know how time consuming wrapping string around an object can be! =)
ResponderEliminarThis came out so pretty, love it!! I have some projects with string on my never ending to-do list, someday.... :)
ResponderEliminarMuy bonito y muy sencillo de hacer, creo que tienes muy bnuenas ideas, me voy a ahcer seguidora tuya para no perderte la pista.
ResponderEliminarRaquel
http://raqueljimenezbisuteria.blogspot.com.es/