Photobucket Photobucket Photobucket Photobucket Photobucket

viernes, 23 de marzo de 2012

Funda para el móvil


Hoy os traigo una funda para el móvil, es fácil de hacer, rápida, barata y la mar de mona :)
Today I'm showing you a phone case, it's easy to make, fast, cheap and really cute :) 

Estos son los materiales que necesitareis:
These are the supplies you'll need to make it:


Fieltro                 Felt
Retales de tela      Fabric scraps
      Tijeras                Scissors
         Hilo                  Thread
       Aguja                 Needle

Cómo se hace:
1. Mide tu móvil y corta dos rectángulos de fieltro 1.5 cm más grande por los cuatro lados.
2. Elige un dibujo que te guste, que sea sencillo y que esté formado por varias secciones.
3. Recorta las diferentes partes de tu dibujo en diferentes telas que combinen.
4. Cóselas a uno de los rectángulos de fieltro.
5. Junta los dos rectángulos y cóselos entre sí con un hilo grueso. Menos la parte superior que es por dónde vas a meter el móvil! :)
Y ya está, la pantalla de tu móvil no tendrá ni un arañazo más!


How to: 
1. Mesure your phone and cut two felt rectangles 1.5 cm bigger than your mesure.
2. Choose a drawing, silhouette... that you like, that has different parts, it's better if it's a simple one.
3. Cut the different parts out using different fabrics that match.
4. Sew them on one of the felt rectangles.
5. Put together the two triangles and sew them with a thick thread. Leave open the upper side to put your phone in the case! :)
And that's it, the screen of your phone won't have one more scratch!

Parties:
See the sidebar

My entry into Strut Your Stuff sponsored by Appliances Online and the Bosch Washing Machines

lunes, 12 de marzo de 2012

Pulseras de nudos

Cuando era pequeña (no hace tanto :) me encantaba hacer pulseras de nudos, luego estuve un montón de años sin hacer pero últimamente me ha dado por ellas otra vez, no sólo se pueden hacer pulseras con esta técnica también llaveros, fundas para el móvil, adornos...

When I was little (not so long ago :) I loved to make friendship bracelets, then I didn't make any for a long time but lately I've got into it again, you can make not only bracelets but keychains, phone cases, ornaments...


Aquí os dejo la última que he hecho. En esta web Friendship-Bracelets tenéis miles de diseños, videos con tutoriales, fotos y todo lo que podáis imaginar, sólo necesitáis hilo de bordar y tiempo!
Al final del post he puesto la  explicación de los nudos y el diseño para hacerla por si os animáis. En cuanto coges el tranquillo es facilísmo de hacer. 

Here's the last one I've made. You can check this web Friendship-Bracelets for patterns, video tutorials, pictures and everything you can imagine, the only thing you need is embroidery floss and spare time!
At the end of the post I've posted the knot instructions and the patterns you need to make it . As soon as you get the hang of it, it's really simple.


Instrucciones  para hacer los nudos
El primero es el nudo hacia delante, como veis los nudos siempre son dobles.
El segundo el nudo hacia atrás.
El tercero es una combinación de ambos, primero un nudo hacia detrás y luego uno hacia delante.
El cuarto es la combinación al revés, es decir, primero un nudo hacia delante y luego uno hacia detrás.
Y con estos cuatro nudos ya podéis hacer los diseños que queráis.


Knot instructions
The first one is the forward knot, as you can see you always have to make double knots.
The second one is the backward knot.
The third one is a combinations of the first two. The first knot will be bakward and the second forward. 
The fourth one is the combination the other way around, first the forward knot then the backward one.
You can make any patterns just with these four knots.


Parties
See the sidebar

lunes, 5 de marzo de 2012

Bebé en bañera


Hice este bebe tomándose un baño hace un montón de tiempo y me sigue encantando, lo tengo colocado en mi baño, creo que es super gracioso! La idea es de una web argentina Utilisima que ya he comentado en alguna otra ocasión. No tengo fotos de como se hace pero es muy fácil.

Materiales:
Un bloque de corcho blanco o telgopor
Dos bolas de corcho blanco, una más pequeña que la otra
Bolitas pequeñas de corcho (de las que está formado el corcho)
Masilla para modelar
Enduído plástico
Pintura acrílica
Pincel
Rotulador de punta fina negro
Un palillo

Instrucciones:
1. Modelar la bañera en el bloque de corcho.
2. Ponerle una capa de enduído.
3. Pintar del color que queráis.
4. Pintar la bola grande de color carne.
5. Añadir los detalles, ojos, pelo, boca...
6. Formar una bolita pequeña de masilla que será la nariz y dos aplastadas que formarán las orejas. 
7. Dejarlas secar y pintarlas de color carne. Pegarlas a la cabeza.
8. Cortar la bola de corcho más pequeña en dos partes. Una de ellas formará el cuerpo del bebé y la otra quitando un cuarto formará la mano. Pintarlas de color carne. 
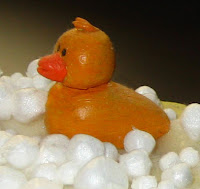
9. Formar el patito con la masilla, el cuerpo es una gota, la cabeza una bolita, el pico un cono dividido por la mitad y las plumas de la cabeza dos rollitos. Dejar secar, pegar y pintar.
10. Insertar un palillo en la parte de abajo de la cabeza y en la media bola del cuerpo.
11. Cubrir la bañera de enduído (se seca y queda sólido y blanquecino y parece la espuma) y antes de que se seque colocar el bebé, la mano y el patito.
12. Añadir las bolitas de corcho para simular las burbujas.

Parecen muchos pasos pero se hace enseguida!
Espero que os guste!
Besos!


I made this baby having a bath a long time ago, but I still love it, it's in my bathroom since then, I think it's so cute! The idea is from an Argentinian web called Utilisima, that I've already mentioned some other time. Since I made it a long time ago I don't have any pics but it's quite easy.

Supplies:
A styrofoam block
Two styrofoam balls, one smaller than the other
Little balls of styrofoam (those that pop up when you break a block)
Clay or some modelling material
A light filler
Acrylic paint
Paint brush
Marker
A toothpick

How to:
1. Model the bathtub with the styrofoam block.
2. Apply a coat of the filler.
3. Paint the color you like.
4. Paint the big ball with  skin tones.
5. Draw the details, the eyes, the mouth, the hair...
6. Form a little ball with the clay that will be the nose and two more and flatten them to form the ears.
7. Let them dry, paint them with skin tones. Glue them to the head.
8. Cut the smaller ball in two. One of the parts will be the body of the baby, the other will be the hand but you'll have to cut a quarter of it to form it. Paint them with skin tones.
9. Model the duck with the clay. The body is a drop shape, the head a little ball, the beak is a cone divided in two and the feathers are two rolls. Let the pieces dry, glue them and paint them.
10. Insert the toothpick in the head and in the half of the ball that will be the body of the baby.
11. Put a thick coat of filler on the bathtub (it hardens when it dries and gets a foamy look) and before it is completely dry, place the baby, the hand and the duck.
12. Add the little styrofoam balls to simulate the bubbles.

It seems like a million steps but it doesn't take that much.
I hope you like it
XOXO


Parties:
See the sidebar.

domingo, 4 de marzo de 2012

Ya llegó mi regalo!

Hola!! Estoy tan contenta que tenía que escribir un post y es que ayer me llegó mi regalo! Mi kit de quilling! Participé en el giveaway de Eye Heart y gané!!! Y ayer llegó por fin el paquete:

Hi!! I'm so glad that I had to post this, my giveaway just arrived! My quilling kit! I entered Eye Heart's Giveaway and I won!!! 

La verdad es que no tengo ni idea de esta técnica pero por suerte el kit es para "torpes" así que creo que seré capaz de aprender. Este es el contenido del paquete:
El kit 
Una revista con un montón de ideas 
Y una tarjeta de Cinthya (que es un encanto)

The truth is that  I don't know anything about quilling but since the kit is for dummies I think I'll be able to learn. This is what came in the packet:
The kit
A magazine with a lot of ideas
A card from Cinthya (who is a darling)


Dentro del kit hay:
Una revista con todas las instrucciones de como realizar proyectos
Un montón de tiras de papel de varios colores 
Una regla
Un botecito de pegamento
La herramienta necesaria para curvar los papelitos y que no tengo ni idea de como se llama

Inside the kit there are:
A magazine with all the how to make the quilling projects
A bunch of papers (different colors)
A ruler
A bottle with glue
The tool to curve the papers (I can't remember the name)


A que es chulo!!!!
Estoy deseando empezar a utilizarlo, en cuanto termine el primer proyecto lo publicaré (si me queda bien... :) Me encanta esta letra que decoró Cinthya así que igual pruebo a ver si me sale.
GRACIAS CINTHYA!!!!

Is it cool, right!!!
I' can't wait to start using it, as soon as I finish my first project I'll post it (as long as it turns out right :) I love this letter that Cinthya made so maybe I'll try this.
THANKS CINTHYA!!!!