Photobucket Photobucket Photobucket Photobucket Photobucket

miércoles, 19 de diciembre de 2012

Tilda navideña


Esta es una de las tarjetas de Navidad que he enviado este año. Me encanta Tilda! Y este sello es super tierno. El papel es Glacier Roads de la colección North Country de Prima, la coloreé con lápices acuarelables  y añadí un poco de pintura con purpurina en el sombrero y pintura con relieve en el vestido.


This is one of the Christmas cards I've sent this year. I love Tilda! And this image is super sweet. The paper is Glacier Roads from North Country Collection by Prima and I colored her with watercolor pencils. I added some glitter paint on her cap and dimensional paint on her dress.


Parties
See sidebar

miércoles, 12 de diciembre de 2012

Calentadores de manos caseros


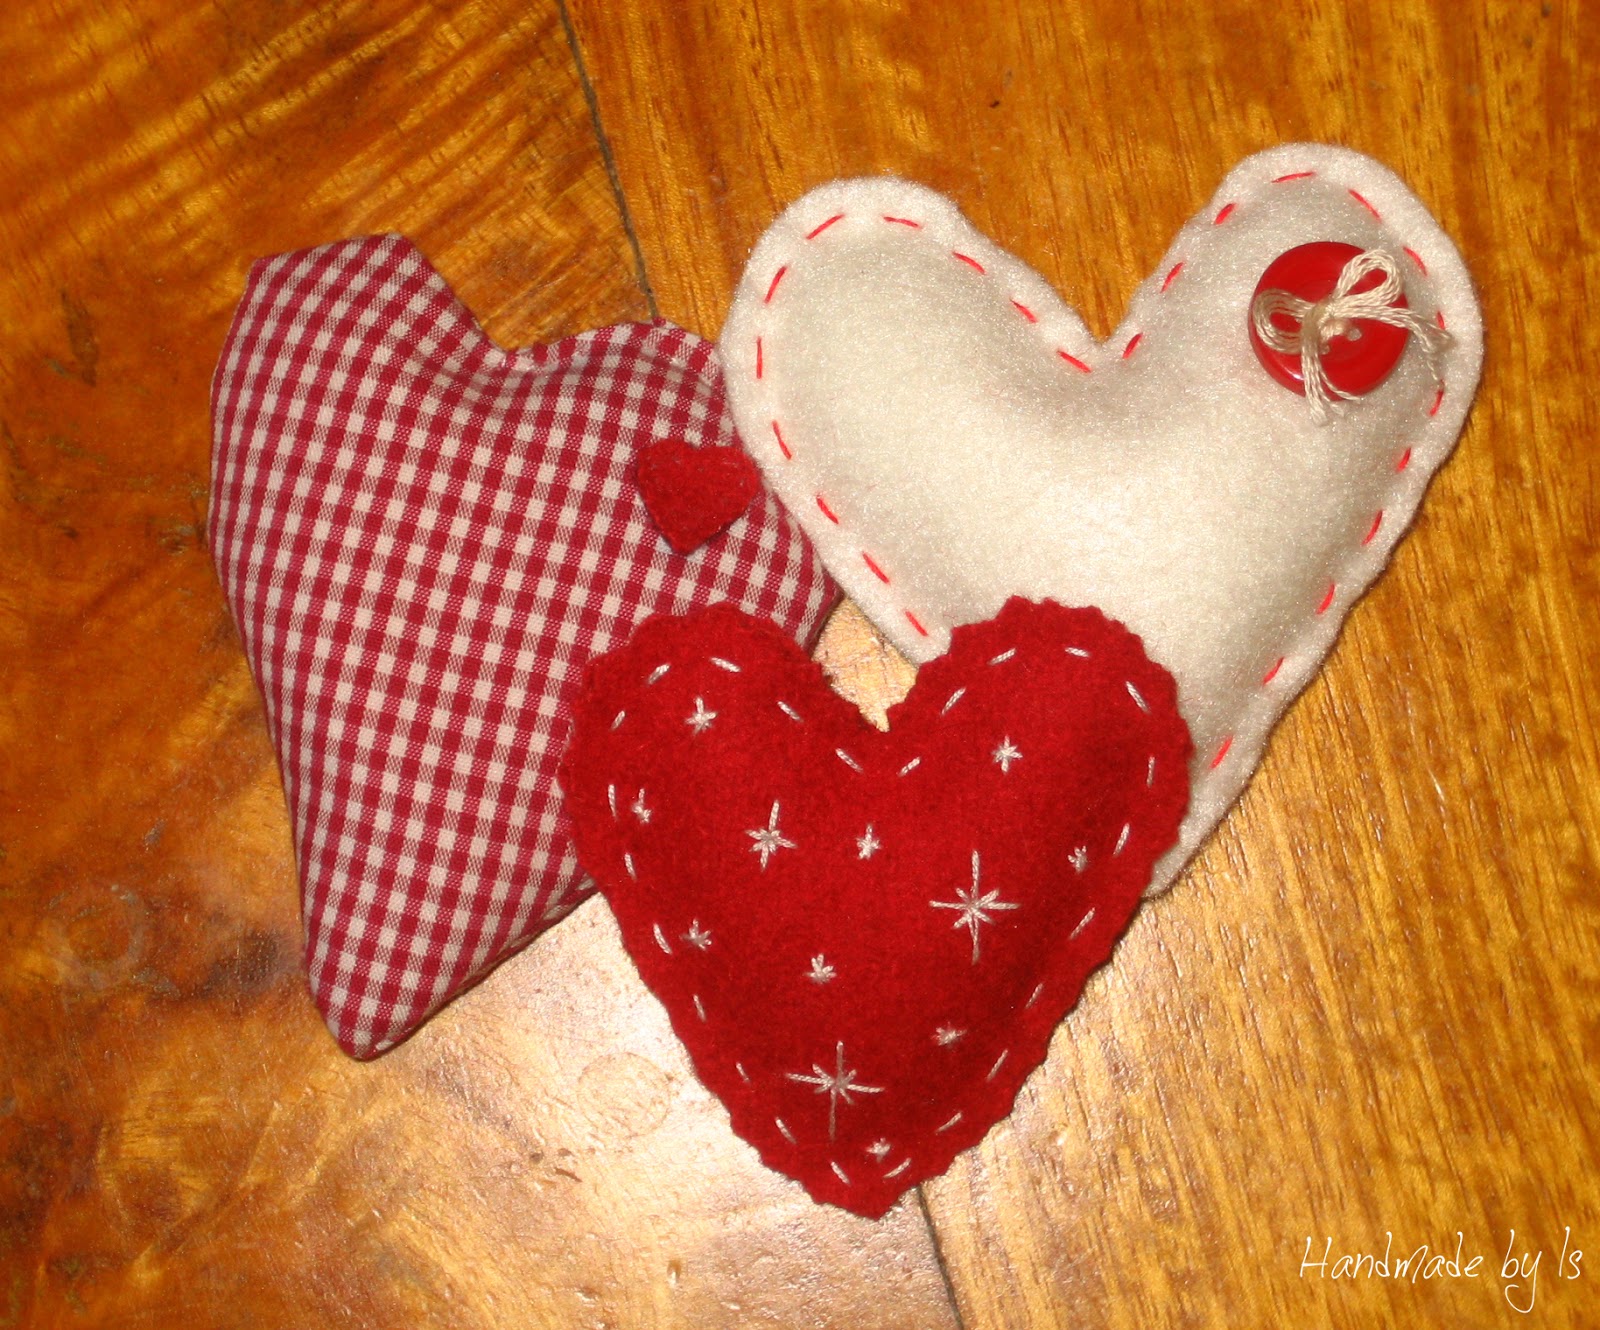
Soy de las que siempre tienen las manos heladas así que este proyecto además de muy navideño y decorativo me viene estupendo. Hay cientos de ellos en Internet por lo que me imagino que ya todo el mundo sabe hacerlos pero por si no solo hace falta un poco de fieltro blanco y rojo, y un trozo de tela que encontré por ahí, hilos y un botón, coser dos trozos de tela iguales en la forma que más os guste por el borde dejando un agujerito para rellenar con el arroz, terminar de cerrarlo y ya está! calentadores de manos al momento!
Yo los he metido 30 segundos en el microondas y salen bastante calientes. (tras sacarlo del microondas huele un poco raro pero se pasa enseguida).


My hands are always cold so this project is perfect for Christmas, very decorative and it’s also perfect for my hands. Three in one! There are hundreds of them on Internet so I guess everybody knows hot to make them but in case you don’t you just need some white and red felt, a piece of fabric that I found, threads and a button, cut 2 equal pieces of the fabric into any size or shape you like, sew the edges all the way around but leave a hole to pour the rice in, fill the pouch with rice, sew up the hole and you have your hand warmers.
I left them 30 seconds in the microwave ant they were quite hot (when you take them out the microwave it smells kind of funny but it doesn’t last long).


Parties
See sidebar

lunes, 3 de diciembre de 2012

Colgador de bolsos


Hace algún tiempo me dieron este colgador de bolso en una boda, la verdad es que lo encuentro super útil y lo utilizo bastante (como podéis observar por las marcas...) el caso es que aunque útil no era especialmente bonito así que decidí mejorarlo un poco y con un trozo de papel decorado, pegamento y Glossy Accent ha quedado estupendo!


Some time ago I got this bag holder and it really comes in handy when you're in public places , I use it a lot (as you can guess from the scratches...) the thing is that although useful it wasn't very beautiful so I decided to improve it and with a scrap of paper, some glue and some Glossy Accent it turned out quite nice!


Parties
See sidebar

lunes, 26 de noviembre de 2012

Subway Art


Cuanto tiempo... Pero he vuelto!
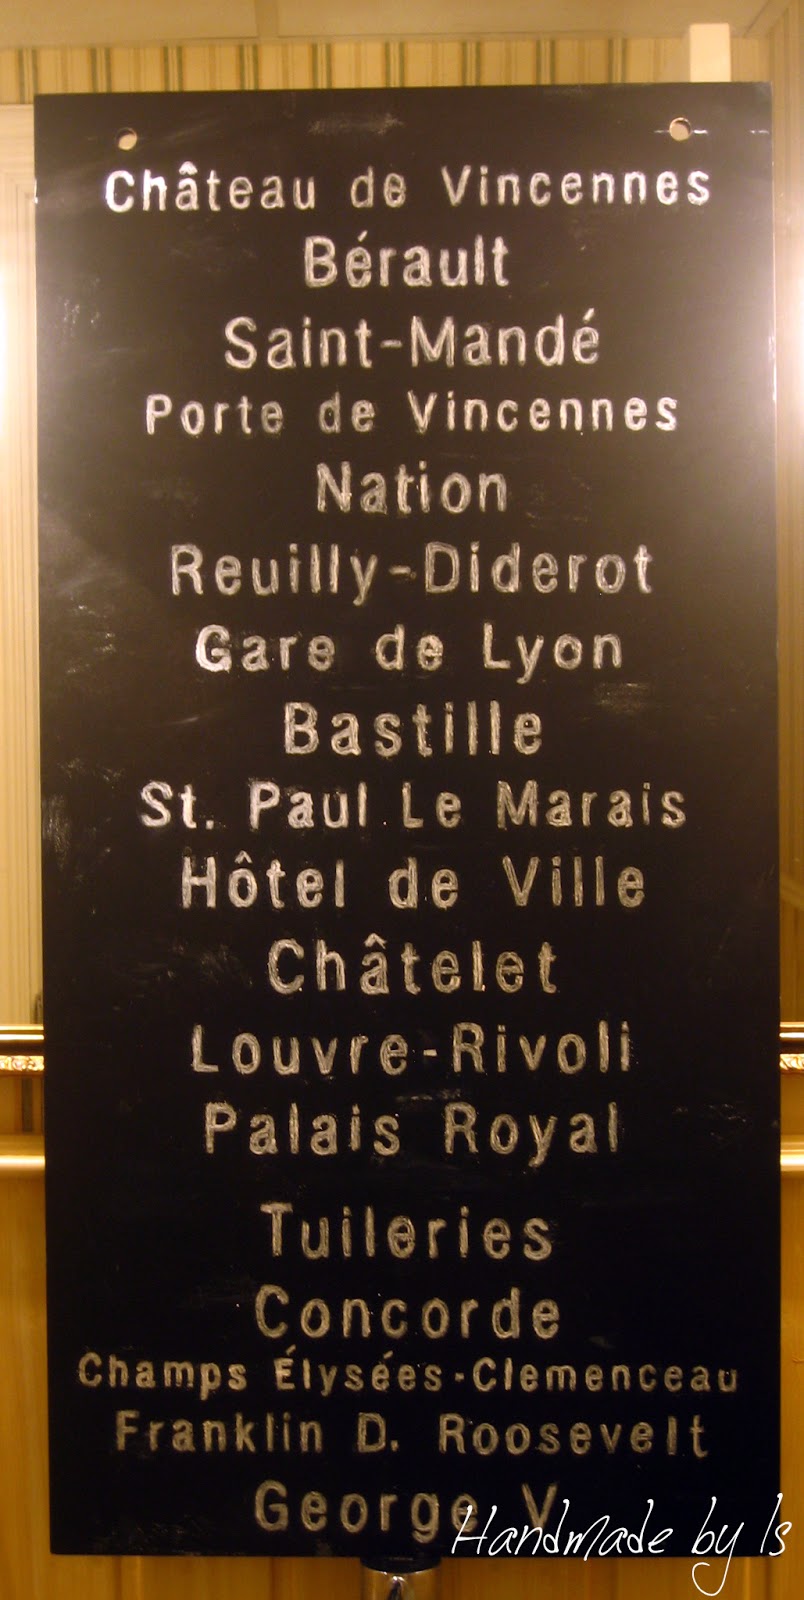
Llevaba tiempo queriendo hacer un cartel de metro de los que hay miiiles en Internet y cuando encontré este panel de publicidad al lado de un contenedor no me lo pensé, ya tenía la base. Elegí la línea 1 del metro de París (Oh! París...). 
Primero hice el cartel con Photoshop, luego encontré esta web en la que puedes dividir la foto en hojas DIN A4 para poderlo imprimir en casa. Las uní y pinté por detrás con cera blanca. Repasé las letras y se quedaron marcadas, además como me apoyaba para repasar las letras se "manchó" un poco la base lo que le dio el acabado perfecto un poco desgastado. Después rellené las letras y voilà, j'ai mon affiche de la ligne 1! ;)


It's been a long time since my last post but I'm back!
I'd been wanting to make a subway art poster of which I've seen thousands on Internet so when I came across this board that someone had thrown away I thought it was perfect for the poster. I chose the line 1 of the Paris subway (Oh! Paris...) 
First I created the poster on Photoshop, then I found this web that allows you to split the picture into DIN A4 sheets so you can print it at home. I glued the parts with tape and I turned the paper backwards and used a crayon to cover the letters. I traced the letters, and the board got stains which is great because I like the shabby look. After that I filled the letters with the crayon and voilà, j'ai mon affiche de la ligne 1! ;)


Por si queréis hacer uno aquí os dejo la imagen, haz clic sobre ella y guárdala en tu ordenador.
In case you want to make one, here's the image, click on it and save it in your computer.


Parties:
See Sidebar

miércoles, 17 de octubre de 2012

Calendario con bloques de madera


Hace tiempo añadí a mi tablero de cosas que quiero hacer de Pinterest este calendario, creo que es un regalo perfecto... aunque todavía no sé para quién :) Hacerlo es facilísimo!
Aquí están los materiales:

Some time ago I pinned this calendar onto my Pinterest board, I think it makes a perfect gift, I don't know yet who I'll be giving it to... It's really simple to make!
Here are the materials:


Se me olvidó incluir en la foto la tinta Distres (walnut stain) para terminar los bordes de los bloques y de los papeles, y así quedaron:

I forgot to include in the pic my Distress Ink (walnut stain) to finish the blocks and  papers edges, you can see how they turned out: 


Imprimí los números y los meses utilizando la fuente Mr. Giggles, a recortar y a pegar!
I printed the numbers and months (Mr. Giggles font), cut them and glued them on the blocks.


Mis bloques son de 5 x 5 cm. La base era la pata de un mueble, ni idea de lo que mide... 
El primer bloque debe llevar los números: 0-1-2-3-4 y 5
El segundo: 0-1-2-6-7 y 8 (el 6 hace también el 9, hay que tenerlo en cuenta y ponerlo en un papel que no importe que lo gires).

My blocks are 5 x 5 cm. The bottom block was a shelve foot, I have no idea what it measures...
The numbers for the first block are: 0-1-2-3-4 and 5
For the second: 0-1-2-6-7 and 8 (6 doubles as the 9 so chose your paper carefully so you have no problem when you turn it down).

Y sí, se que el cartel del mes está muy torcido pero es que mi cortadora de papel corta torcido!! En serio, no estoy loca! Creo que me debe haber tocado una defectuosa... en fin ese es el encanto de las cosas hechas a mano, no?


And yes, I know that the month sign isn't straight at all but there's something wrong with my paper trimmer's grid and my papers are always uneven! I'm not crazy, it's true! I think it's defective... anyway that's is the charm of the handmade things, isn't it?


Parties 
See Sidebar


mop it up mondays featureCraft Junkie Too Friend

lunes, 8 de octubre de 2012

Zapatero giratorio


Hoy quería enseñaros el zapatero de mi madre. Realmente no está hecho a mano por mí, pero como lo hicieron entre mi padre y mi madre (que también se llama Isabel) y yo ayudé un poco, he pensado que no estaba haciendo muchas trampas ;)

Vimos la idea en una publicidad de una tienda de zapatos y nos encantó. Solo se necesitan: 

Cuatro tablas de madera redondas
Una barra metálica hueca (esta es de una cortina)
Una cinta para acabar las maderas
Unas ruedas
Un pomo como terminación de la barra

Los estantes son giratorios así que es muy cómodo para coger los zapatos.

La verdad es que ha quedado chulísimo, no os parece?


Today I wanted to show you my mom's shoe rack. It isn't handmade by me, but since it was made by my dad and my mom (and her name is also Isabel) and I helped a bit, I thought I wasn't cheating ;)

We saw it on a magazine, it was from a shoe store ad and we loved it. The supplies you need to make it:

Four rounded pieces of wood
A metallic rod 
Some ribbon to finish the wood edges
Wheels
A glass knob to finish the rod

The shelves roll so it's really easy to grab the shoes

It turned out great! don't you think?


Parties
See Sidebar
Craft Junkie Too Friend
  

martes, 2 de octubre de 2012

¿Sin inspiración para una tarjeta? Copiala!

En septiembre fue el cumpleaños de mi prima así que le hice esta tarjeta para acompañar el regalo. A pesar de que me encanta el sello de Gorjuss no se me ocurría como hacer la tarjeta así que terminé copiando el dibujo que aparece en el paquete, lo sé, muy triste pero se me echaba el tiempo encima y tenía que acabarla! He borrado los libros de la base porque a mi prima no le gusta leer (incomprensible!!)
La he coloreado con lápices acuarelables, las mariposas las dibujé así como el globo. Añadí Glossy Accent en el vestido y un poco de hilo de cáñamo para el globo. No tenía papel a rayas así que lo coloreé también! Un poco de Distress Ink (Vintage Photo) y ya está!


My cousin's birthday was last september so I made this card to go with the present. Although I love the Gorjuss stamp I hadn't any ideas to make a card with it so I ended up copying the drawing that comes with the stamp, I know, shame on me, but the birthday was getting closer and I had to make the card! I erased the books because my cousin doesn't like to read (I can't understand it!).
I colored her with watercolor pencils, I drew the butterflies and the balloon. I added some Glossy Accent on her dress and some twine. I didn't have a striped paper so I colored some white card stock. A little bit of Distress Ink (Vintage Photo) and you're done! 


Parties
See sidebar