Photobucket Photobucket Photobucket Photobucket Photobucket
Mostrando entradas con la etiqueta tutoriales. Mostrar todas las entradas

lunes, 26 de noviembre de 2012

Subway Art


Cuanto tiempo... Pero he vuelto!
Llevaba tiempo queriendo hacer un cartel de metro de los que hay miiiles en Internet y cuando encontré este panel de publicidad al lado de un contenedor no me lo pensé, ya tenía la base. Elegí la línea 1 del metro de París (Oh! París...). 
Primero hice el cartel con Photoshop, luego encontré esta web en la que puedes dividir la foto en hojas DIN A4 para poderlo imprimir en casa. Las uní y pinté por detrás con cera blanca. Repasé las letras y se quedaron marcadas, además como me apoyaba para repasar las letras se "manchó" un poco la base lo que le dio el acabado perfecto un poco desgastado. Después rellené las letras y voilà, j'ai mon affiche de la ligne 1! ;)


It's been a long time since my last post but I'm back!
I'd been wanting to make a subway art poster of which I've seen thousands on Internet so when I came across this board that someone had thrown away I thought it was perfect for the poster. I chose the line 1 of the Paris subway (Oh! Paris...) 
First I created the poster on Photoshop, then I found this web that allows you to split the picture into DIN A4 sheets so you can print it at home. I glued the parts with tape and I turned the paper backwards and used a crayon to cover the letters. I traced the letters, and the board got stains which is great because I like the shabby look. After that I filled the letters with the crayon and voilà, j'ai mon affiche de la ligne 1! ;)
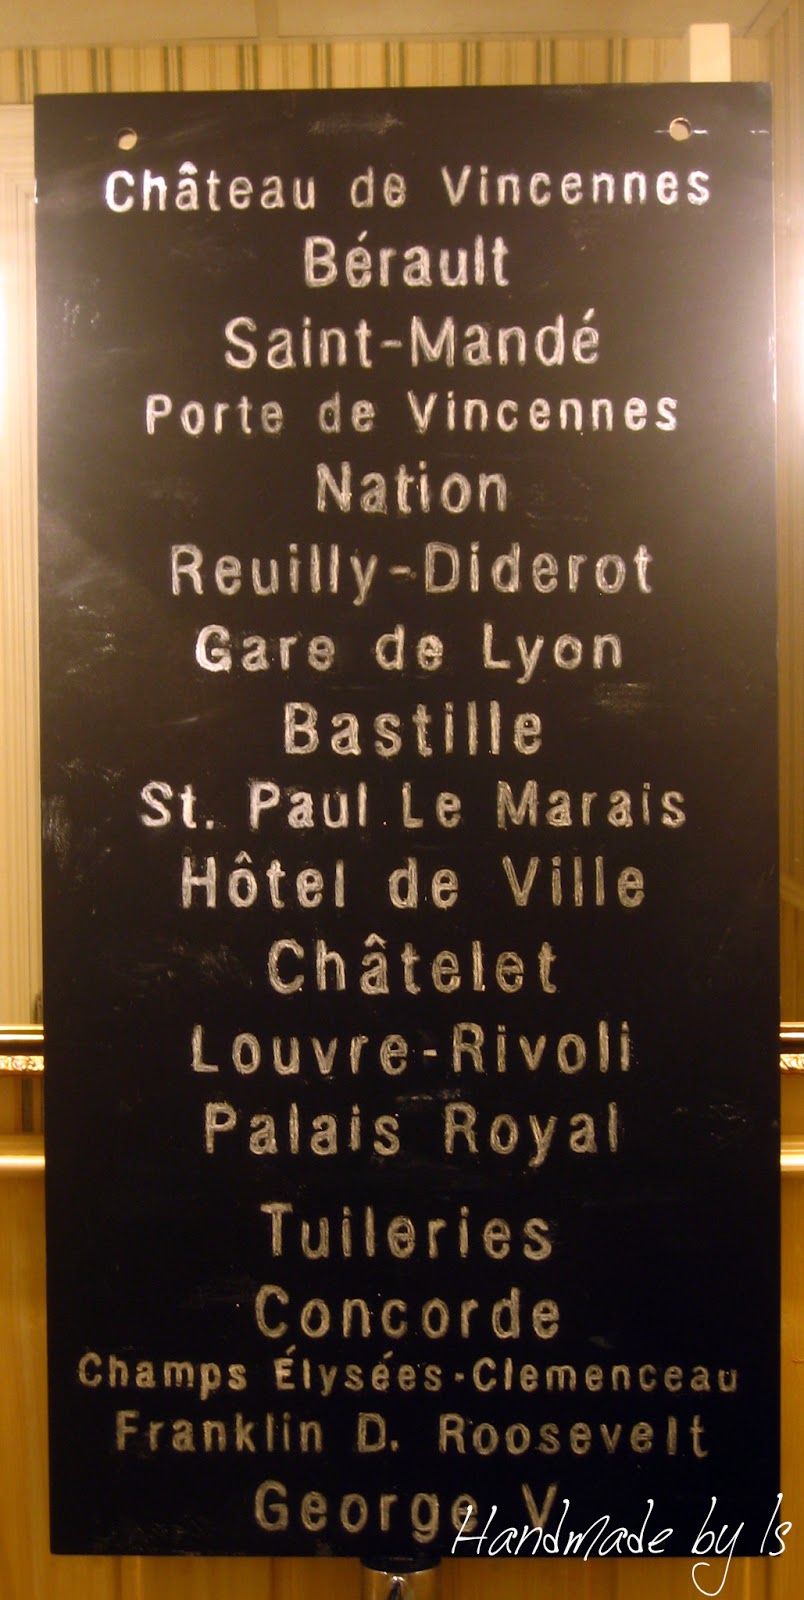

Por si queréis hacer uno aquí os dejo la imagen, haz clic sobre ella y guárdala en tu ordenador.
In case you want to make one, here's the image, click on it and save it in your computer.


Parties:
See Sidebar

miércoles, 17 de octubre de 2012

Calendario con bloques de madera


Hace tiempo añadí a mi tablero de cosas que quiero hacer de Pinterest este calendario, creo que es un regalo perfecto... aunque todavía no sé para quién :) Hacerlo es facilísimo!
Aquí están los materiales:

Some time ago I pinned this calendar onto my Pinterest board, I think it makes a perfect gift, I don't know yet who I'll be giving it to... It's really simple to make!
Here are the materials:


Se me olvidó incluir en la foto la tinta Distres (walnut stain) para terminar los bordes de los bloques y de los papeles, y así quedaron:

I forgot to include in the pic my Distress Ink (walnut stain) to finish the blocks and  papers edges, you can see how they turned out: 


Imprimí los números y los meses utilizando la fuente Mr. Giggles, a recortar y a pegar!
I printed the numbers and months (Mr. Giggles font), cut them and glued them on the blocks.


Mis bloques son de 5 x 5 cm. La base era la pata de un mueble, ni idea de lo que mide... 
El primer bloque debe llevar los números: 0-1-2-3-4 y 5
El segundo: 0-1-2-6-7 y 8 (el 6 hace también el 9, hay que tenerlo en cuenta y ponerlo en un papel que no importe que lo gires).

My blocks are 5 x 5 cm. The bottom block was a shelve foot, I have no idea what it measures...
The numbers for the first block are: 0-1-2-3-4 and 5
For the second: 0-1-2-6-7 and 8 (6 doubles as the 9 so chose your paper carefully so you have no problem when you turn it down).

Y sí, se que el cartel del mes está muy torcido pero es que mi cortadora de papel corta torcido!! En serio, no estoy loca! Creo que me debe haber tocado una defectuosa... en fin ese es el encanto de las cosas hechas a mano, no?


And yes, I know that the month sign isn't straight at all but there's something wrong with my paper trimmer's grid and my papers are always uneven! I'm not crazy, it's true! I think it's defective... anyway that's is the charm of the handmade things, isn't it?


Parties 
See Sidebar


mop it up mondays featureCraft Junkie Too Friend

lunes, 28 de mayo de 2012

Marco para anillos


Y sigo con los marcos... La verdad es que tengo un montón y como me encanta hacer proyectos con cosas que tengo en casa pues eso que me repito un poco... Esta idea la vi en The Crafty Housewife que a su vez la había visto en Peach Fizzz.  Me pareció super chula y fácil de hacer así que aquí os dejo el tutorial por si os animais.

And another frame... The truth is that I have a lot of them and since I love to make projects with things that I've already have, I have lots of frame projects.. oh well... I saw this idea on The Crafty Housewife who had found it on Peach Fizzz. I think it's super cool and easy to make so here's the how to in case you want one.


Y un poco de tela gruesa que se me olvidó fotografiar...
And a piece of thick fabric that I forgot to take a picture of...


Mide tu marco y corta la bayeta del mismo ancho, a continuación empieza a enrollarla hasta que formes un rulito y aseguralo con un poco de pegamento.
Start off by cutting your cloth to the same width as your frame. Tightly roll them into a sausage making sure to glue the end down so it doesn't unroll.


Haz suficientes rulitos para llenar el marco
Continue to make rolls until they fill your frame


No está muy bonito... vamos a forrarlo con la tela
Not very nice... let's cover it with the cloth


Corta un trozo de tela del mismo ancho que tus rulitos y suficiente para cubrir dos. Pon un poco de pegamento en los bordes y enróllalos hacia el centro hasta que se encuentren en el medio.
Next cut a piece of fabric the same width as your rolls and enough to cover two of them. Put glue on the border and stick a roll at each end of the fabric and roll them inwards towards each other, ensuring the fabric is tightly wrapped around each roll, until they meet in the middle.


Pon pegamento donde se junten los dos rulitos para que se mantenga cerrado.
Put some glue where the two rolls meet (in the middle) to keep it sturdy.


Colócalos en tu marco y asegúralos con un poco de pegamento
Place them in your frame and glue the borders to keep them secure.


Yo coloqué una madera por detrás para que quedara mejor acabado.
I added a piece of wood in the back to finish it.


Coloca tus anillos!
Place your rings!


Parties:
See sidebar


This project was featured:
These Peas Taste Funny
   handmade projects


homemade crafts

lunes, 7 de mayo de 2012

Azúcar?


El otro día vinieron unas amigas a casa a tomar café y había visto por Internet que la gente hace formas con el azúcar así que pensé que sería una buena idea para sorprender a mis amigas. Realmente no hace falta poner ni materiales ni como se hace pero por si acaso...

My friends came to my house to have a coffee. I had seen on Internet that people make sugar shapes so I thought it would be a good idea to surprise them.  I think that there's no need of an explanation but just in case...


Coges un poco de azúcar y le añades unas gotas de agua, tiene que estar terroso.
Add a few drops of water to the sugar, it gets the consistency of wet sand.


Lo metes en tu cubitera
Fill the ice tray with the sugar mixture


Esperas unas horas (yo como no estaba segura de cuantas esperé 24 h pero no sé si se podrá desmoldar antes)
Wait a few hours (I waited 24 h but maybe you can wait less)


Desmolda tus terrones
Pop your sugar lumps out


Sorprende a tus amigas
Surprise you friends


Fácil, no?
Easy peasy


Parties
See sidebar

lunes, 23 de abril de 2012

Figura africana

Hace un tiempo  me atreví con esta figura que vi en la web de Utilisima. Me pareció muy decorativa y fácil de hacer así que me puse manos a la obra y este es el resultado.
No pongo la lista de materiales y el modo de hacerlo porque está perfectamente explicado en el enlace de Utilisima.


Some time ago I saw this figure on Utilisma web. I think it's very decorative and easy to make so I got down to work and this is how it turned out.
You have the supplies and the how to on the web in spanish. 


Supplies:
A piece of wood 8 x 8 cm and 2 cm thick
1.50 m of aluminum wire
Cardboard roll 20 cm long and 5 cm diameter (I used a kitchen roll)
Newspaper
Masking tape
Two-component putty, clay...
White cotton cloth
White glue
Acrylic paint: chocolate brown, orange, beige


How to:
1. Make a hole in the center of the piece of wood. Shape the wire to form the body, arms and head.
2. Cut along the cardboard roll, wrap the part of the wire that forms the body with the newspaper to give it volume. Put it into the cardboard  roll. With masking tape, strengthen it.
3. Pass the wire through the hole of the wood and fix it with the putty. Model the arms, neck and head, adding clay on the wire. Model the baby.  Leave until it's completely dry.

4. Soak the cotton cloth  in white glue, to make the dress tunic, turban and the kanga (cloth used to carry babies especially in East Africa). 
5. "Dress" the body with the cloth. Let it dry.
6. Paint with  chocolate brown  the skin and clothing with orange. Leave white the turban and the kanga. 
You can add accesories like pots, bowls, earrings...


Parties:
See the sidebar

lunes, 2 de abril de 2012

Bolas de café

Aunque parece que la moda de las bolas decorativas ya pasó, a mí me siguen encantando así que he hecho estas con granos de café y me han quedado así de chulas y además dejan un aroma a café delicioso!.


Los materiales que se necesitan son:
Bolas de corcho blanco
Pintura marrón
Cola blanca
Granos de café

La forma de hacerlas no creo que requiera mucha explicación...
Pintáis las bolas de marrón para que no se vea el fondo blanco
Vais poniendo la cola y situando los granos de café, alternando la dirección cada fila que hagáis.
Y ya está! Fácil, barato y rápido, me ENCANTA!!


Although decorative balls seem a bit out at the moment, I still love them so I made these two with coffee beans, they turned out great and they smell really good!.


Here are the supplies:
Styrofoam balls
Brown paint
Glue
Coffee beans 


The 'how to' doesn't need much explanation...
Paint the balls with the brown paint to avoid the white spaces
Start gluing the beans, you have to alternate the direction of the beans each row.
And that's it! Easy, cheap and fast, I LOVE it!


Parties
See the sidebar


viernes, 23 de marzo de 2012

Funda para el móvil


Hoy os traigo una funda para el móvil, es fácil de hacer, rápida, barata y la mar de mona :)
Today I'm showing you a phone case, it's easy to make, fast, cheap and really cute :) 

Estos son los materiales que necesitareis:
These are the supplies you'll need to make it:


Fieltro                 Felt
Retales de tela      Fabric scraps
      Tijeras                Scissors
         Hilo                  Thread
       Aguja                 Needle

Cómo se hace:
1. Mide tu móvil y corta dos rectángulos de fieltro 1.5 cm más grande por los cuatro lados.
2. Elige un dibujo que te guste, que sea sencillo y que esté formado por varias secciones.
3. Recorta las diferentes partes de tu dibujo en diferentes telas que combinen.
4. Cóselas a uno de los rectángulos de fieltro.
5. Junta los dos rectángulos y cóselos entre sí con un hilo grueso. Menos la parte superior que es por dónde vas a meter el móvil! :)
Y ya está, la pantalla de tu móvil no tendrá ni un arañazo más!


How to: 
1. Mesure your phone and cut two felt rectangles 1.5 cm bigger than your mesure.
2. Choose a drawing, silhouette... that you like, that has different parts, it's better if it's a simple one.
3. Cut the different parts out using different fabrics that match.
4. Sew them on one of the felt rectangles.
5. Put together the two triangles and sew them with a thick thread. Leave open the upper side to put your phone in the case! :)
And that's it, the screen of your phone won't have one more scratch!

Parties:
See the sidebar

My entry into Strut Your Stuff sponsored by Appliances Online and the Bosch Washing Machines